How to Change Your Engine Oil in Five Easy Steps
Changing engine oil is a routine maintenance task that many vehicle owners choose to perform themselves. Understanding the correct procedure helps ensure that the work is done safely and effectively. This article outlines a structured approach to draining old oil, replacing the filter, and adding fresh oil, along with general guidance on selecting the appropriate oil grade for common engines. The process involves a series of steps that, when followed carefully, can contribute to the longevity of the engine.
Before beginning, it is important to gather the necessary tools and materials. Common items include a wrench set, an oil filter wrench, a drain pan, a funnel, and the correct amount and type of engine oil. Safety precautions such as wearing gloves and safety glasses are recommended. Working on a level surface and allowing the engine to cool slightly can reduce the risk of burns from hot components. Each step in the process builds on the previous one, so attention to detail is beneficial.
This guide is intended to provide general information. Specific vehicles may have unique requirements, and consulting the owner’s manual is a good practice. The following sections describe a typical sequence for an oil change, with emphasis on methodology rather than guaranteed outcomes.
Preparing the Vehicle and Workspace
Proper preparation sets the stage for a smoother oil change. Start by parking the vehicle on a flat, stable surface. If the engine has been running, allow it to cool for 10 to 15 minutes. Warm oil drains more completely, but extreme heat can cause burns. During this time, gather all equipment: a drain pan large enough to hold the old oil, a socket or wrench that fits the drain plug, an oil filter wrench, a new oil filter, and the correct oil. It is also helpful to have rags or shop towels for any spills.
Safety considerations include ensuring the vehicle is secure. If jacking up the car is necessary, use jack stands rather than relying solely on a jack. The parking brake should be engaged, and wheel chocks placed behind the tires. Personal protective equipment such as nitrile gloves and safety glasses are commonly used to prevent contact with oil and debris. A well-lit and ventilated area contributes to a more comfortable experience.
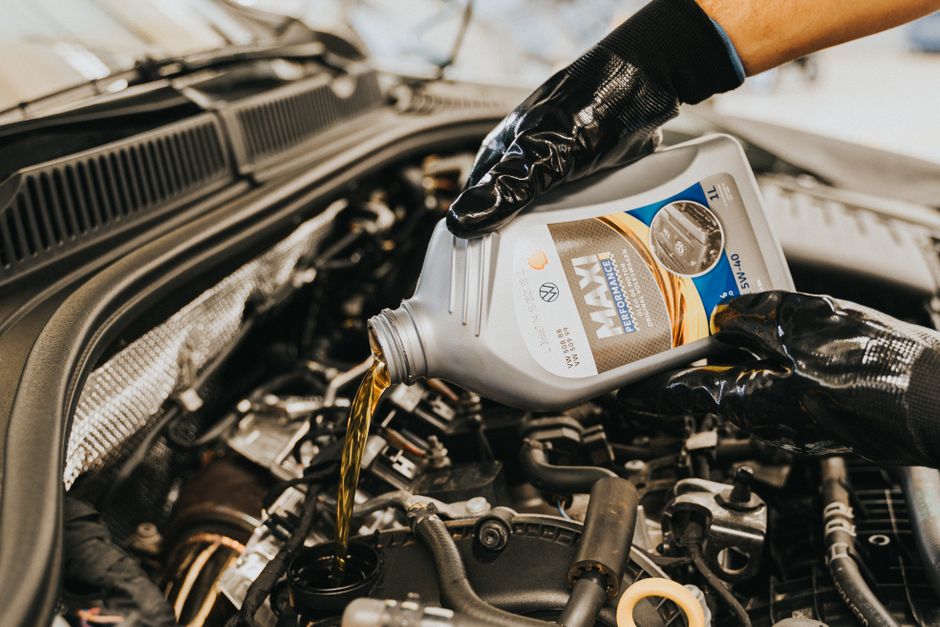
Selecting the right oil grade is a step that depends on the engine type and climate. Many modern engines use 5W-30 or 0W-20, but variations exist. Checking the owner’s manual for the manufacturer’s recommendation is a reliable approach. Using an oil with the correct viscosity helps maintain proper lubrication across different temperatures.
Draining the Old Oil
With the vehicle prepared, the next step involves draining the used oil. Position the drain pan directly under the oil pan drain plug. Using the appropriate wrench, loosen the plug slowly. It is advisable to wear gloves, as the plug may be coated with hot oil. Once loosened, remove the plug by hand and allow the oil to flow into the pan. Care should be taken to avoid dropping the plug into the drain pan, as retrieving it can be messy.
While the oil is draining, inspect the drain plug gasket for wear. Many plugs have a replaceable gasket that helps prevent leaks. If the gasket appears flattened or cracked, replacing it is a common practice. Allow the oil to drain completely. This process typically takes several minutes. During this time, the drain pan can be positioned to catch any drips.
After the flow has stopped, clean the plug and the drain hole area with a lint-free cloth. Reinstall the drain plug and tighten it to the torque specification found in the repair manual. Overtightening can strip threads, so using a torque wrench is an option for precise application. Properly disposing of the used oil is a key responsibility. Many auto parts stores accept used oil for recycling.
Replacing the Oil Filter
The oil filter should be changed each time the oil is drained. Locate the filter, which is typically attached to the engine block. Using an oil filter wrench, loosen the filter counterclockwise. Some oil may spill, so having the drain pan or a rag underneath is helpful. Once removed, inspect the old filter’s gasket to ensure it is not stuck to the engine surface. If it remains, it can be gently scraped off.
Before installing the new filter, apply a small amount of fresh oil to the rubber gasket on the filter’s base. This step helps create a proper seal and makes future removal easier. A common practice is to fill the new filter with oil before installation, though this depends on the filter’s orientation. For filters mounted sideways or upside down, filling may be impractical. Hand-tighten the filter until the gasket makes contact, then give it an additional three-quarters of a turn. Overtightening can damage the gasket and cause leaks.
After installation, check the area for any leftover oil spills. Wiping the engine block around the filter mount helps keep the workspace clean. The used filter can be placed in a plastic bag to contain residual oil before disposal, as many recycling centers also accept used filters.
Adding Fresh Oil
With the drain plug and filter secured, it is time to add new oil. Locate the oil filler cap on the top of the engine. Remove it and insert a funnel to prevent spills. Pour in the recommended amount of oil, checking the owner’s manual for the exact capacity. Adding oil gradually and pausing to check the level using the dipstick can prevent overfilling.
After adding the initial amount, replace the oil filler cap and start the engine briefly. This allows the new oil to circulate through the engine and fill the filter. After running the engine for about 30 seconds, turn it off and wait a minute for the oil to settle. Then check the dipstick again. If the level is between the minimum and maximum marks, the fill is adequate. If it is low, add small increments until it reaches the correct range.
During this step, it is common to inspect for leaks around the drain plug and filter. A few drips may appear initially, but persistent leaking indicates that tightening may be needed. Checking under the vehicle after a short test drive is an additional precaution some drivers take.
Final Checks and Proper Disposal
Once the oil change is complete, a few final checks contribute to a thorough job. Verify that all tools and rags are removed from the engine bay. Ensure the oil filler cap is securely in place. Check the dipstick one more time to confirm the oil level is correct. A brief test drive can help confirm that the oil pressure warning light does not illuminate and that no unusual noises are present.
Proper disposal of used oil and filters is an environmental consideration. Used engine oil can be toxic if discarded improperly. Many communities have collection sites or authorized recycling facilities. Drain the used oil into a sealed container, and store it until it can be taken to a drop-off point. Used filters should be drained of excess oil and placed in a sealed bag or container. Some auto parts stores and service centers accept both oil and filters for recycling at no charge.
Maintaining a record of the oil change, including the date and mileage, can help track maintenance intervals. While individual experiences may vary, following a consistent procedure may support engine reliability over time. The process described here is a general framework; adjustments may be necessary based on specific vehicle requirements and local regulations.